

We’ll show you how to get the classic Start menu back in Windows 11 so your desktop looks more like Windows 10. It involves adding a registry value to the Windows Registry but don’t worry it is a very simple task.
But before moving ahead It might be interesting to know that what are new features in Windows 11’s start menu. Let’s have a look at them.
New Features of Windows 11 Start Menu
As compared to Windows 10, the Start menu in Windows 11 appears a lot different. You can see that pinned items are displayed at the top and that all the other apps can be accessed through an All apps button.
Only 18 icons can be displayed simultaneously, but you can pin as many as you want.
The “All apps” list lets you find the applications that you haven’t pinned to the main Start page, which takes you to an old and familiar list of your installed applications.
At the bottom, you will find items that are recommended or recent ones. You can set your computer to sleep by pressing the power button, or shut down or restart.
Windows 11 has replaced the old Timeline feature with this new “Recommended” area. With a click on “More”, you can see even more recent activities in the Recommended area.
Although there is no visual search bar on the Taskbar anymore, search works just like it does on Windows 10. You can start typing on Windows’ improved Search UI by hitting Start and starting typing.
Windows 11 has a simpler, easier-to-manage grid of icons compared to the old Live Tiles interface, and I think it works better.
Simply and overall, this new Start menu functions more like a launcher for your most frequently used apps instead of a home screen.
How to Change Windows 11 Start Menu to Classic Start Menu?
You have noticed that Microsoft has centered the start menu in Windows 11. It is mighty attractive and fancy for many peoples but for those who love the old classic menu, it may not be that fancy.
Don’t worry we have got a method to revert this to the style start menu. It can be done by following a simple registry tweak.
Follow these steps
1– Open registry editor, either from run dialogue box or start menu
Open start menu > start typing “regedit” or
Windows+R > type “regedit”
2 – Now, follow the following path
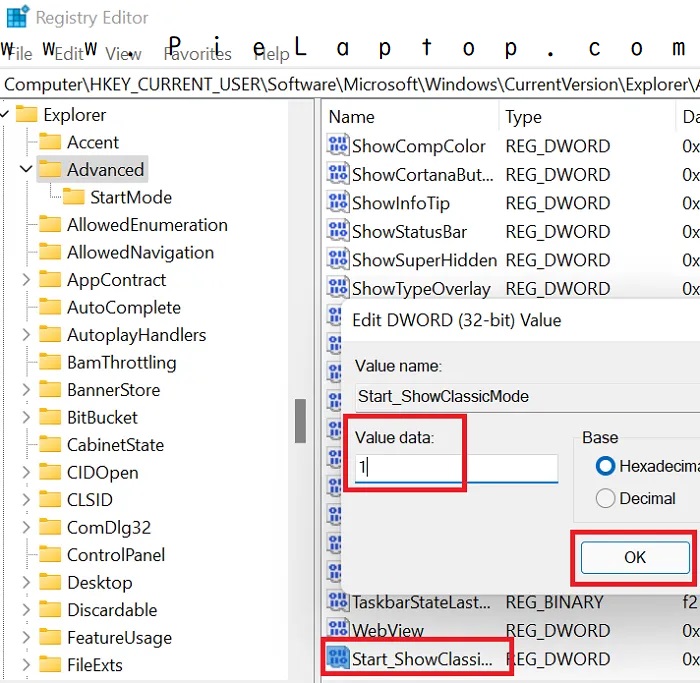
“HKEY_CURRENT_USER\Software\Microsoft\Windows\CurrentVersion\Explorer\Advanced”
You can also copy the path and paste it on the address bar of the Registry Editor.
3– Select New > DWORD (32-bit) Value from the left panel by right-clicking Advanced.

4– Now create a new value and name it “Start_ShowClassicMode”
5– Open this newly created value and change the value to “1” (without quotes) and click Ok.
6– Now, restart your computer, and click start. You have got your classic start menu back.
You can watch this short video that explains this process in just 2+ minutes.
3rd Party Softwares to get back classic menu in Windows 11
As a fact, you should know that this tweak does work for all Windows 11 builds.
There is a very specific Windows 11 build that works with this registry tweak. It has been discovered that updating to build 22000.65 prevents the edit from working.
There is some 3rd party software that can help you to do this.
Start11 : Paid tool, but worth paying for.
You can use any of the above tools to select your desired menu.
Get Start Menu at Left Side
It’ll get the start menu of Windows 11 to the left side of the desktop as used to be in Windows 10.
To do this. . . You have to open the Start menu settings
- Right-click on Taskbar > Settings

- Click Personalization
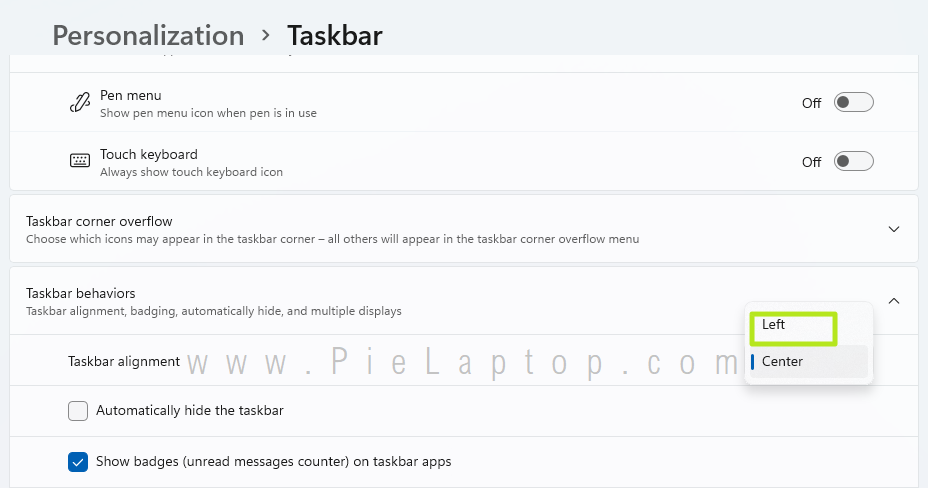
- Now, click or collapse Taskbar behaviors

Here you have two options for Star menu alignment 1) Left and 2) Center
- Click Left to get the start menu on the left side of your desktop.
Also Read